
Table of contents
When you get started with Calendly (which, as you're about to see, is super easy to do!) you’re well on your way to simpler, more efficient scheduling.
Calendly users save an average of four hours each week. Think about how much more time you’ll have to focus on your business goals when you're not busy going back and forth, trying to find a time to meet!
Fortunately, Calendly is a snap to set up. Follow these easy steps to customize your booking page and then test the experience from start to finish. You’ll feel confident you’re creating a polished and professional scheduling experience.
Log in to your Calendly account to follow along. (Don't have a Calendly account? Sign up for free!)
Customize your Calendly booking page
Let’s start by customizing what people see when they book time through your booking page. The first thing to do is update your account settings. It’s where you can change your picture and name, and connect your calendars to Calendly.
Personalize your account settings
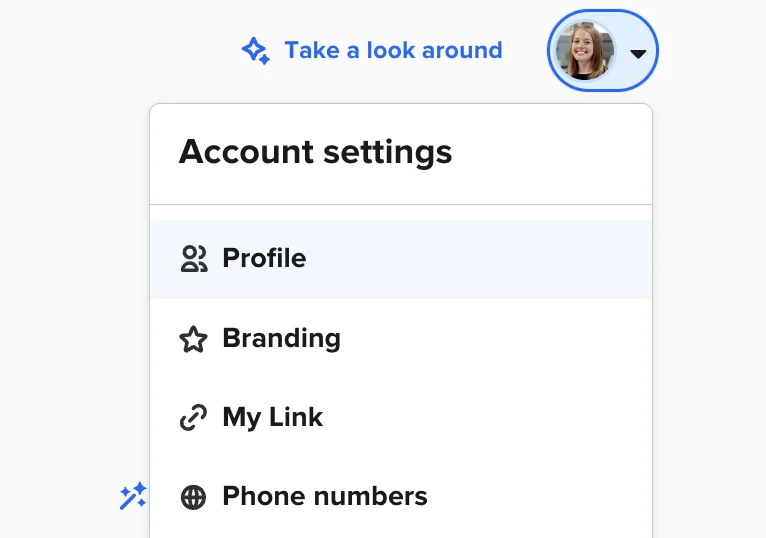
To get to your account settings, select the photo/icon in the upper right hand corner of your Calendly homepage. A dropdown menu will appear. Select “Profile.”
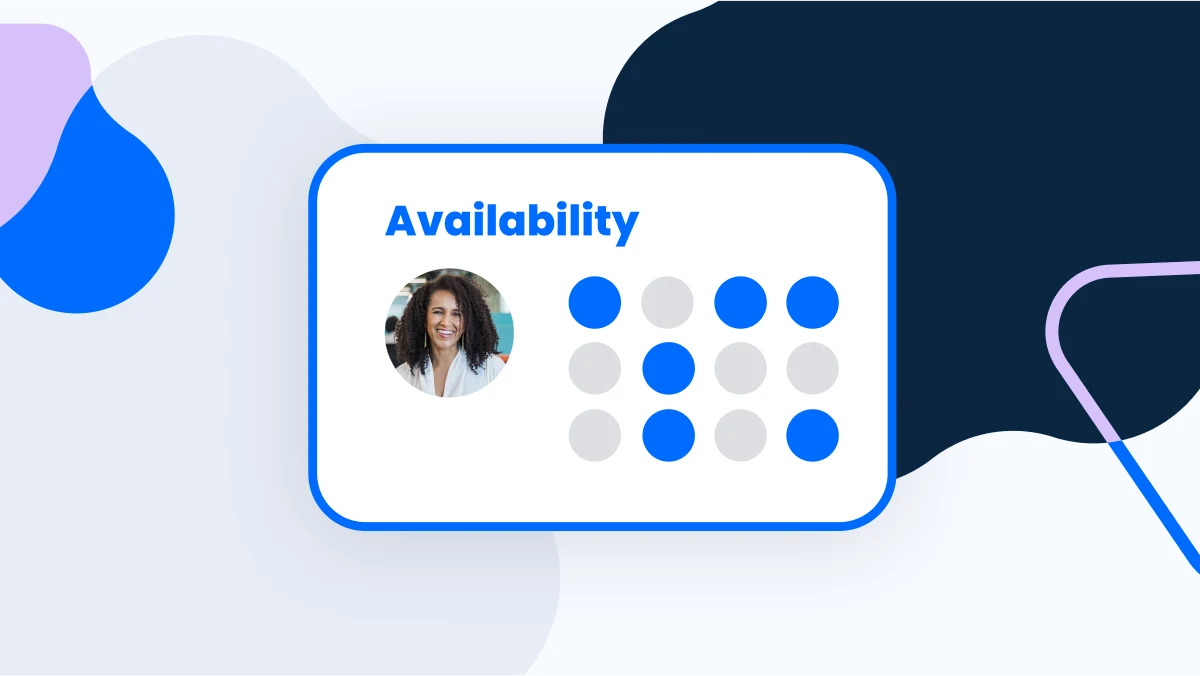
Connect your calendars
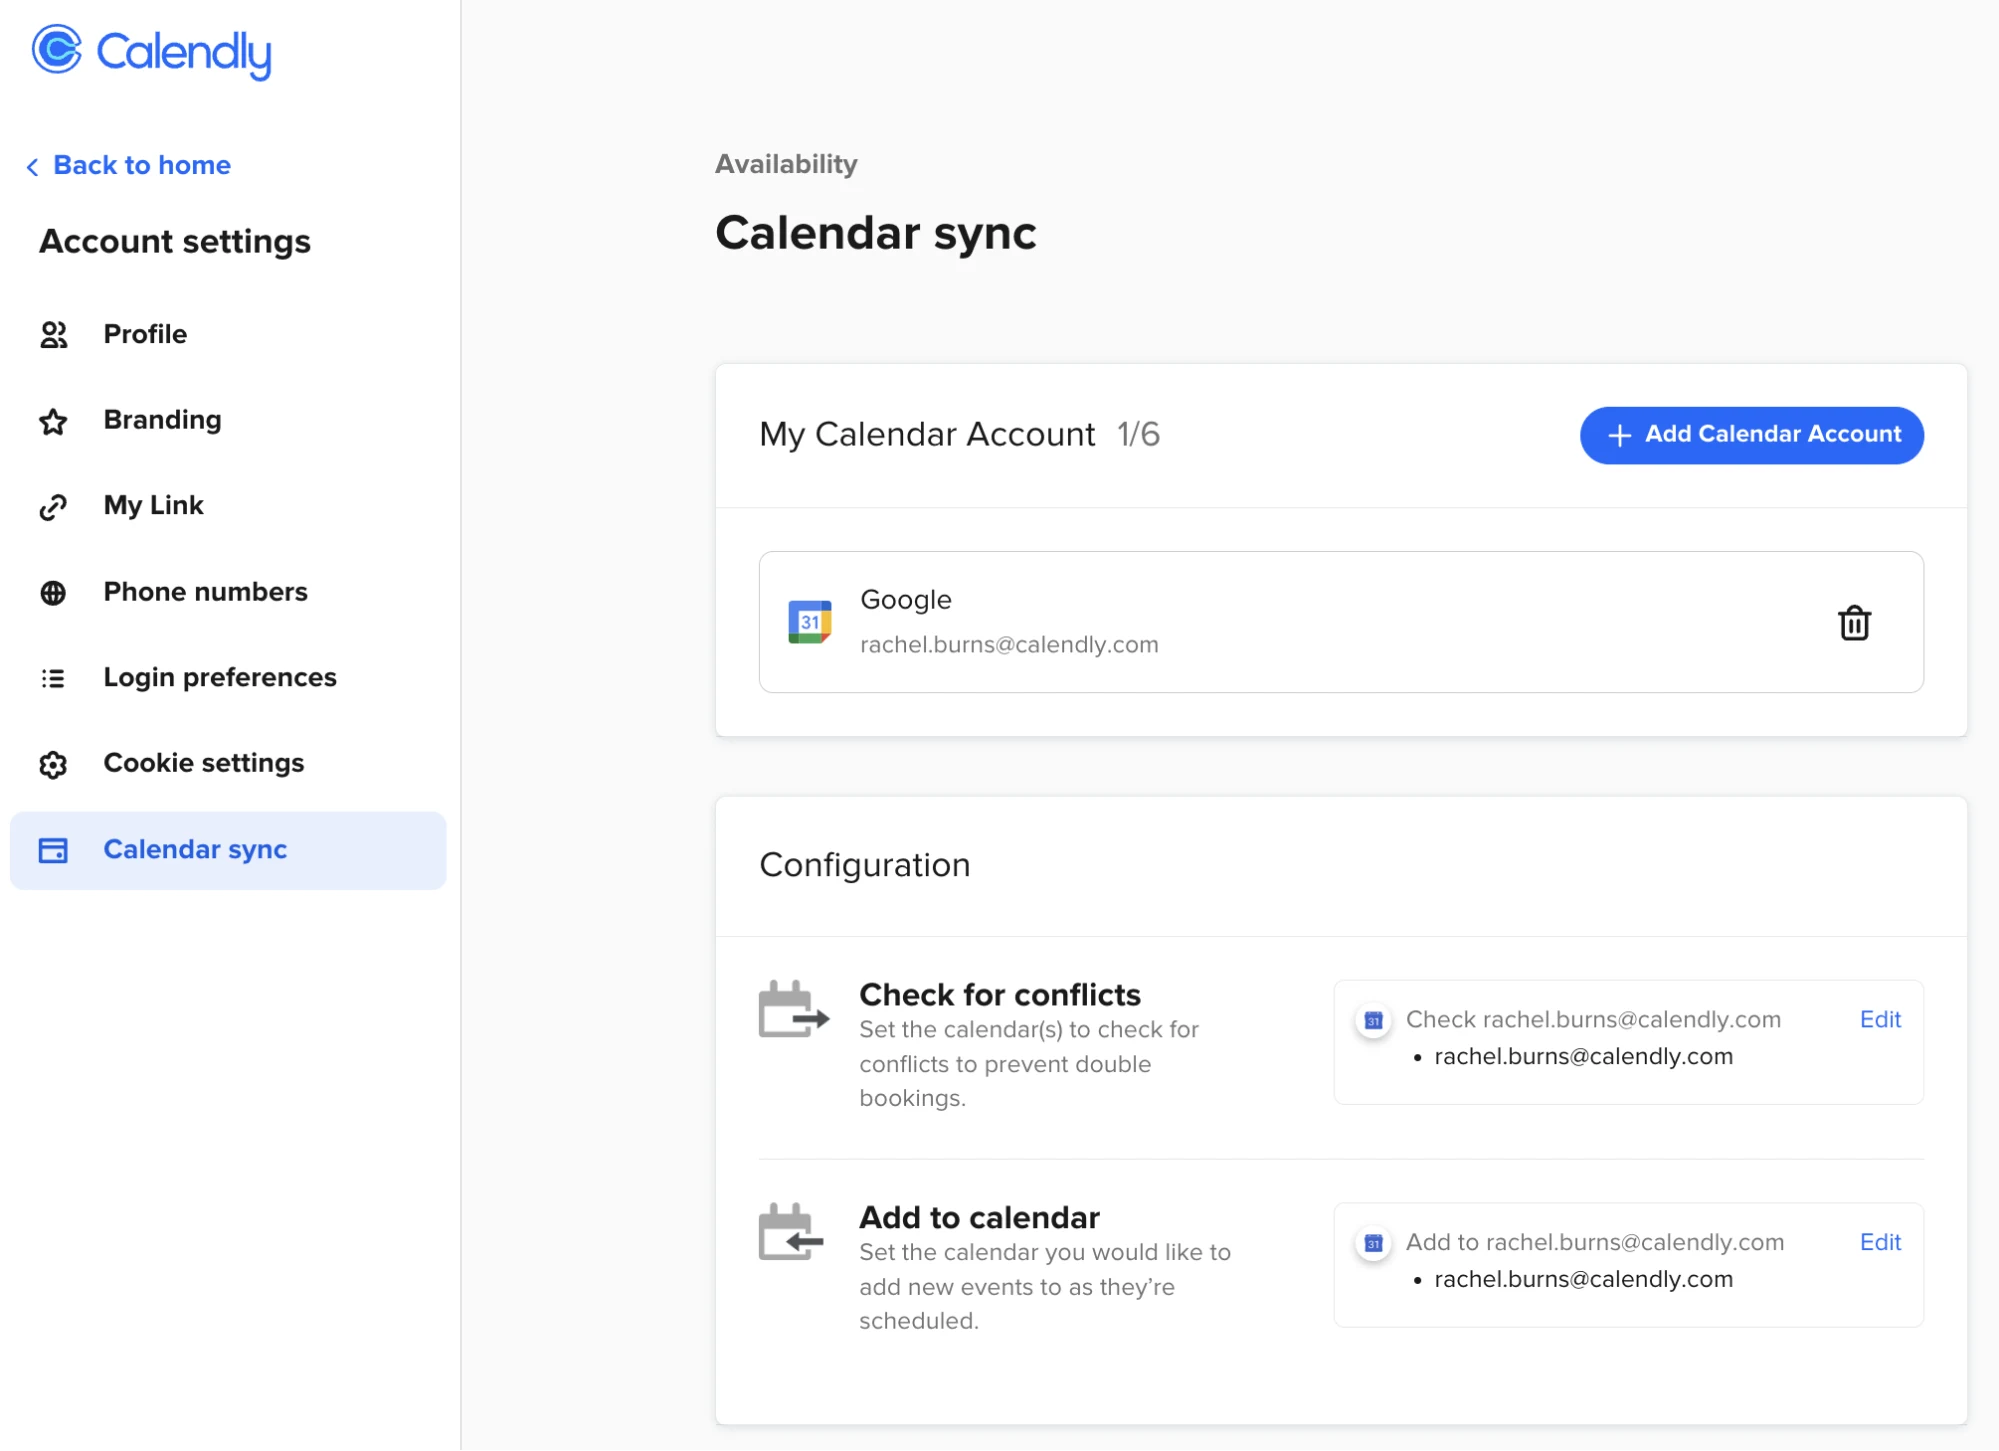
Next, it’s time to let people see when you’re available to meet. When you connect calendars to Calendly, the app looks at your complete schedule and only shows your open time slots on your booking page, so you never need to check your calendars manually for scheduling conflicts. Connecting your work and personal calendars is a great way to avoid double booking.
To sync your calendar, click “Calendar sync” in the Account settings sidebar or dropdown.
For more details on connecting your calendar, check out this step-by-step guide.
Customize an Event Type
Now that you’ve adjusted your account settings and connected your calendars, let’s customize one of Calendly’s preset Event Types. The settings control what people see when they book time on your calendar. To get started, simply go to your Calendly homepage and click on the Event Type you’d like to edit.
In the Event Type editor, there are five different sections of customization settings. We’ll walk through each one now.
Event details
This section contains your meeting’s basic settings. Let’s fill in a few details so people will know more about the meeting.
Event Type name
The top field is for “Event name.” This could be as basic as “one-on-one meeting with [your name]” or something more descriptive, like “Coffee chat,” “Interview,” or “Demo.”
Duration
Choose how long your event will be. You can select from standard lengths of 15, 30, 45, and 60 minutes, or use a custom length.
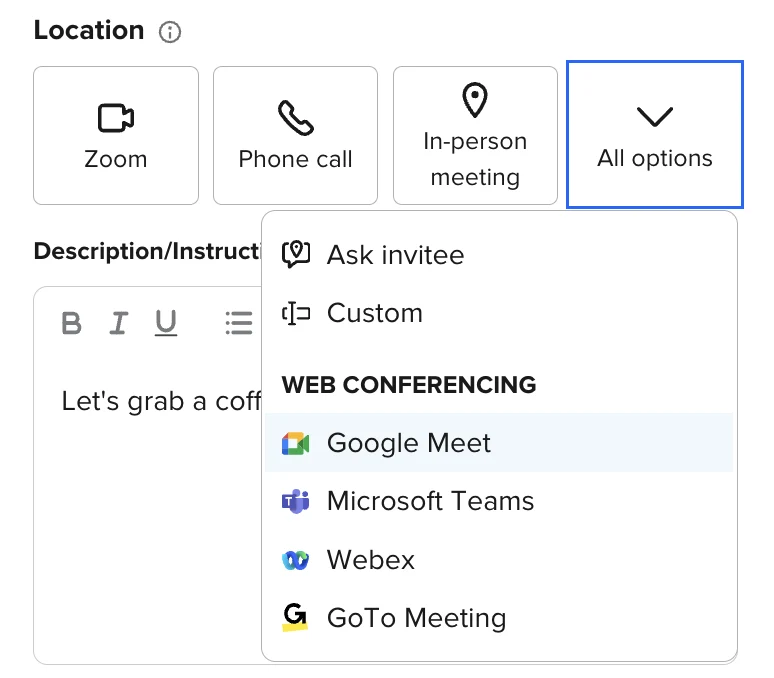
Location
Pick a location for your meeting. You can specify a physical address or location (like a favorite coffeehouse) for in-person meetings, provide a phone number, or let the person who’s booking time with you pick a location. People often use Calendly for virtual meetings through video conferencing tools like Google Meet, Zoom, or Microsoft Teams. All of these options (and more) are available in the location menu.
Hot tip
Be sure to connect your favorite video conference tool to Calendly! When you connect these apps, Calendly adds all conference access details to your meeting invitations automatically. There’s no risk of no-shows or late arrivals because someone can’t find the meeting information.
Description/Instructions
Once you’ve updated the name and location, it’s time to add a meeting description that will appear on your booking page. This can be a short summary of what you expect to talk about at the meeting, or what someone will learn by meeting with you. The more descriptive you are, the better people will understand the purpose of the meeting — and be more likely to book time with you.
Hosts and invitees
This section of the Event Type editor is where you can review hosts that are assigned to an event and add the option for invitees to add guests.
Hosts
Review who the host is for this Event Type. (For most one-on-one meetings you schedule from your own Calendly account, this will be you!)
Invitees
Choose whether or not invitees can add guests by checking the box next to “Allow invitees to add guests.”
Scheduling settings
The next section informs when people can book a meeting with you. This is where you fine-tune your schedule to get booked as much — or as little — as you want.
Date range
Set the date range to let people know how far in advance they can book a meeting with you. The standard is 60 days, but you can change this to any range you like. You can also specify a range of days in your calendar, or have no limit at all.
Available hours
Pick which schedule you want to use for this Event Type. You can use one of the saved schedules from your Availability settings or set custom hours specific to this type of event.
For example, if you want to offer office hours on Monday and Wednesday afternoons only, these custom hours will only apply to this Event Type — it won't affect your default schedule.

Event limits
Buffer time: Back-to-back appointments don’t give you enough time between meetings to get ready (or grab another cup of coffee!). You can set how much time you want automatically blocked off before or after this event. People won't be able to book any meetings with you during those buffer periods. (Note: we recommend adding a buffer either before or after an event, but not both, as that tends to add too many limitations to your availability.)
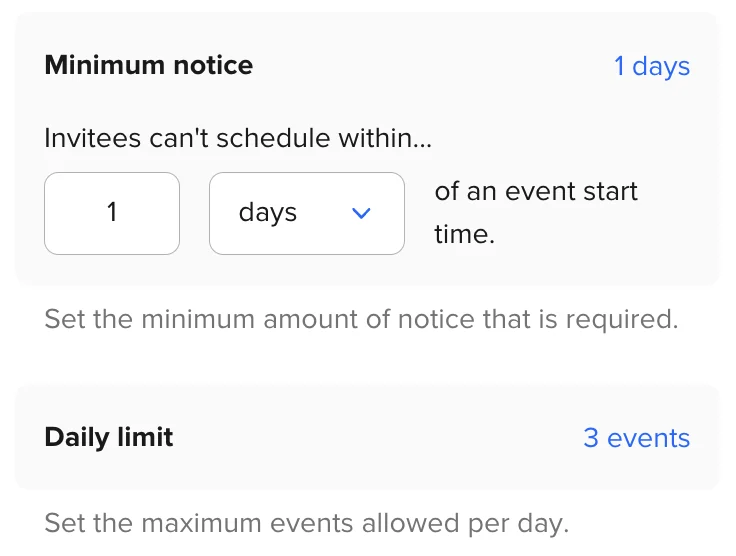
Minimum notice: Choose how far in advance people need to book with you and how many events are allowed per day. If you need time to prepare for meetings or just want to avoid last-minute bookings, you can require that people schedule minutes, hours, or days in advance.
Daily limit: Limit the number of times this Event Type can be scheduled per day. Maybe you offer one-on-one coaching that takes a lot of mental energy and preparation — this setting lets you prevent too many of those sessions per day, while still letting people book other types of meetings.
Additional options
Time zone display: If you’re meeting in person, you can lock this to the time zone of your event location. Otherwise, Calendly automatically detects your time zones to ensure everyone meets at the correct time.
Start time increments: Control how available start times appear on your booking page. For example, if this setting is set to 20 minutes, the time slots that appear within your booking page would be 1:00, 1:20, 1:40, etc. The shorter the increments, the more open times people will see on your booking page.
For a deeper dive into availability settings, check out this guide.
Webinar: Getting started with Calendly
Test your Calendly booking page
Now that you’ve customized the most important settings that inform what people see on your booking page, let’s test the experience so you feel confident inviting others to schedule with you.
Before you start sharing your booking page, it’s a good idea to do some testing and make sure your booking page shows the right information. That way, you’ll feel great about the efficient and professional scheduling experience you’re setting up!
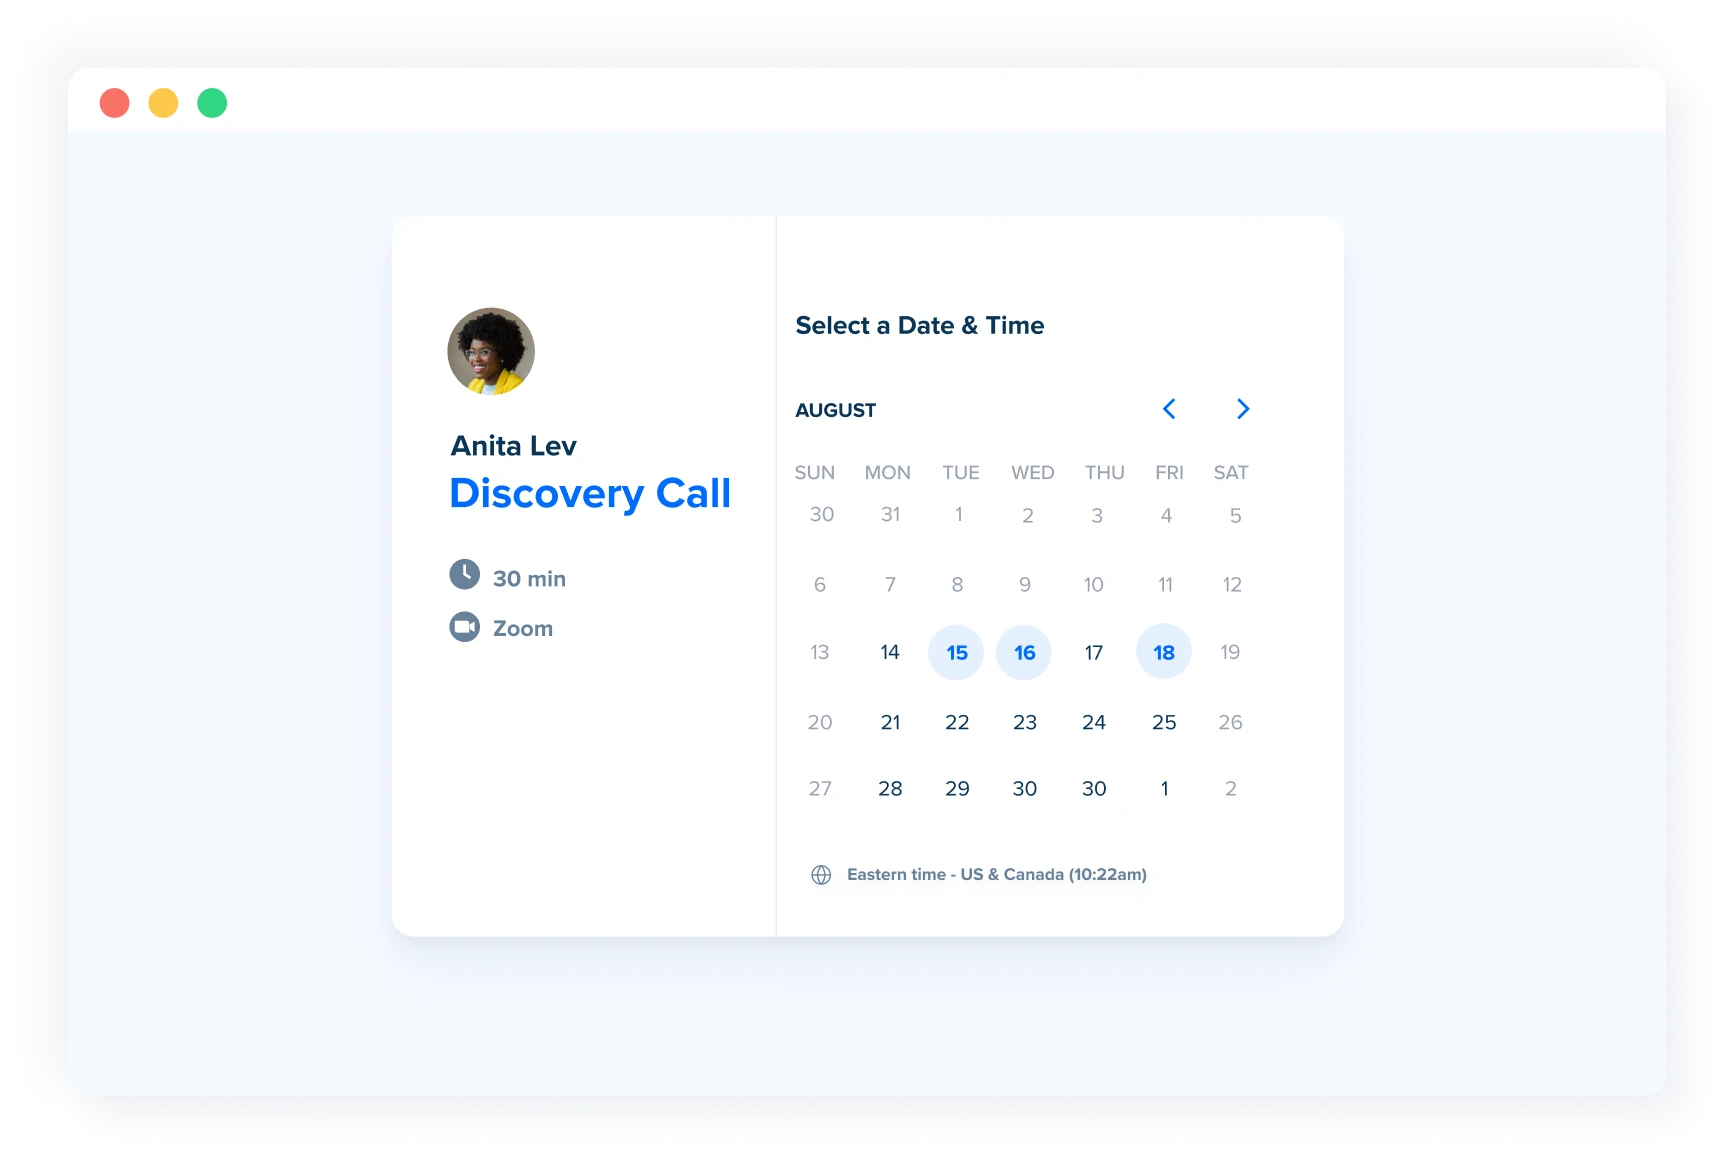
Preview your Calendly booking page
You can preview your booking page right from the Event Type editor!
From your Calendly homepage, select the Event Type you want to preview. An interactive preview of your booking page will show in the right pane of the Event Type editor.
This is where you’ll see your hard work in action. Check your profile picture and name, as well as the meeting’s name, duration, location, and description — all the information you entered earlier. Revisit the steps above to update any incorrect or missing details.
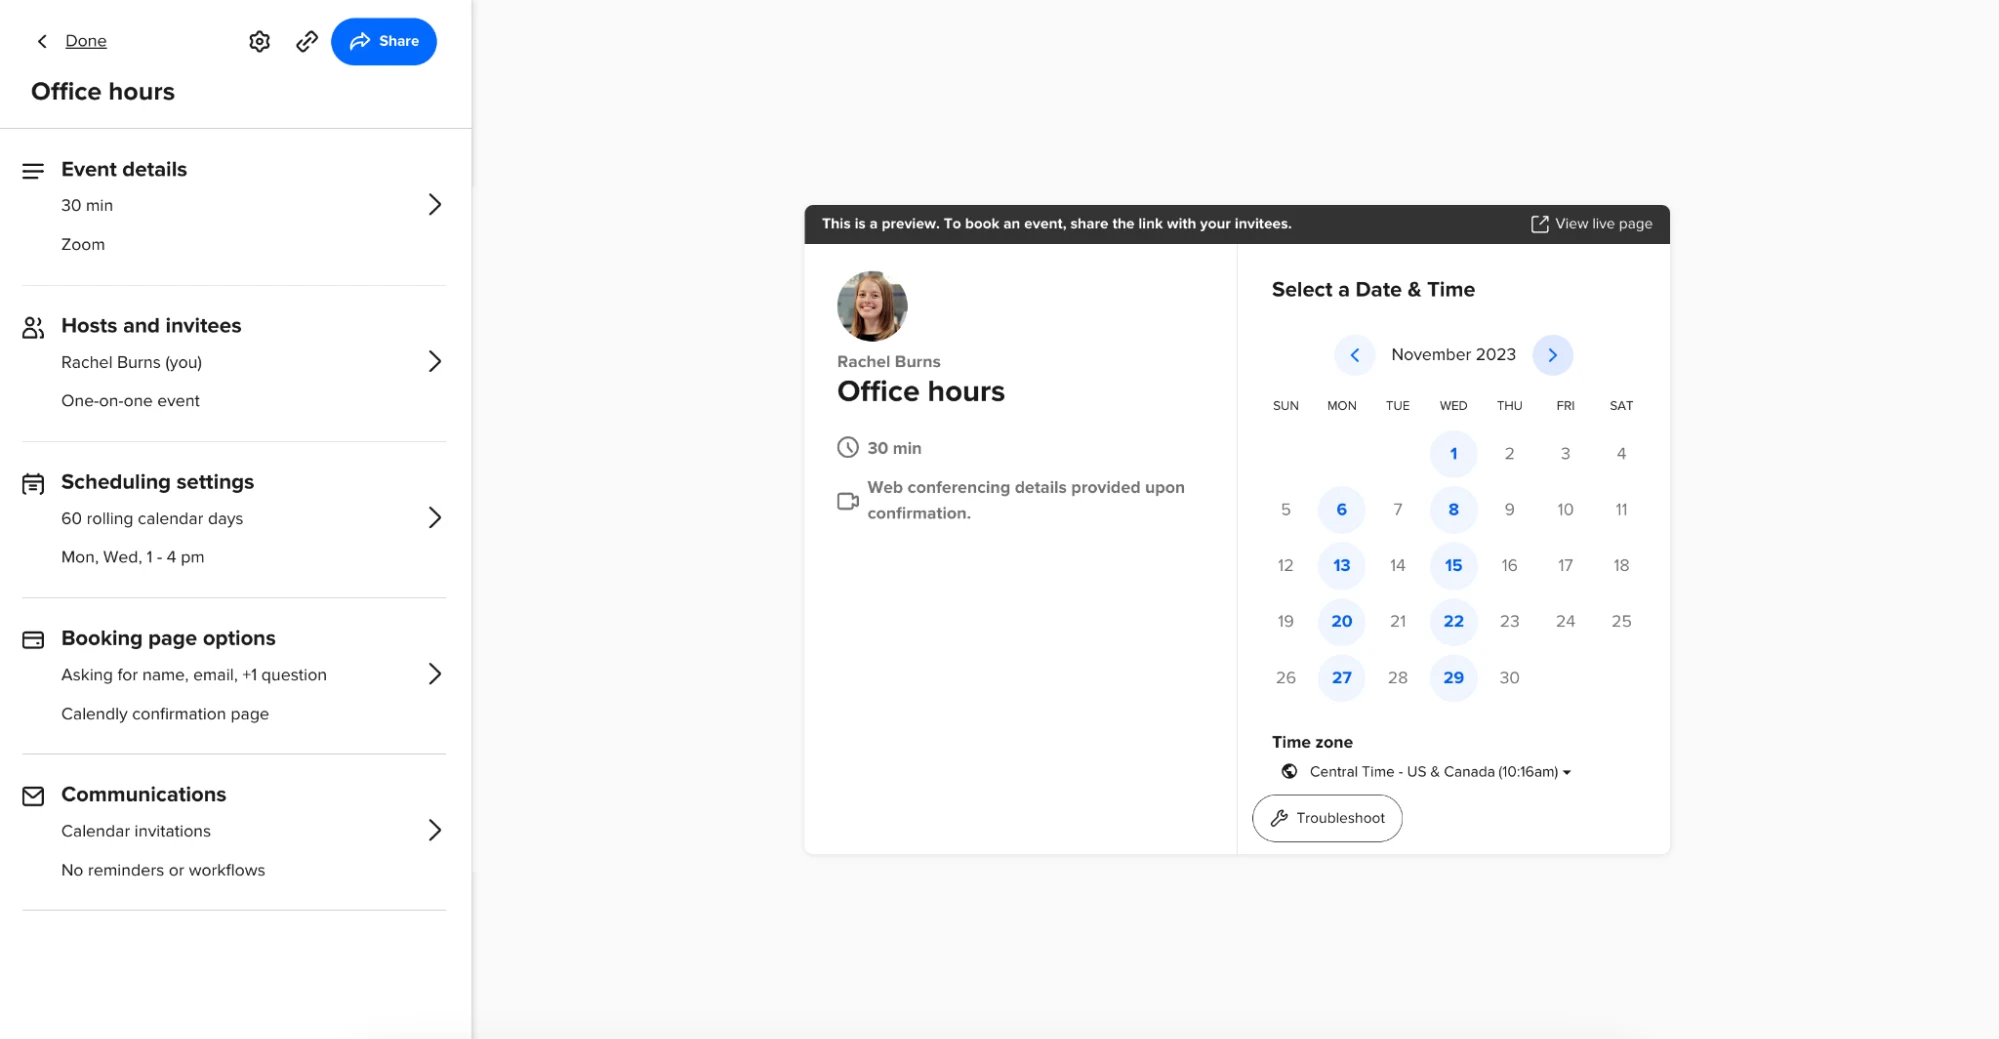
You can also preview and test your booking page from the live link by clicking “View live page” above the preview in the Event Type editor, or by clicking “View booking page” from the Event Type tile on your homepage.
Confirm why times show (or don’t) with the troubleshooting tool
Now let’s confirm that the right times are displaying. Calendly provides a handy troubleshooting tool to help you discover why a time can’t be booked when you think you should be available.
Back on your live booking page, select the “Troubleshoot” button below the calendar. This button and the view it opens are only visible to you. Select any day, and you’ll see all your time slots and whether they are open for meetings. When a time slot is unavailable, Calendly will show you why. A slot could be filled by an appointment on a connected calendar, or a time buffer from an Event Type is preventing a booking during that time, or you may be marked as unavailable on a particular day.
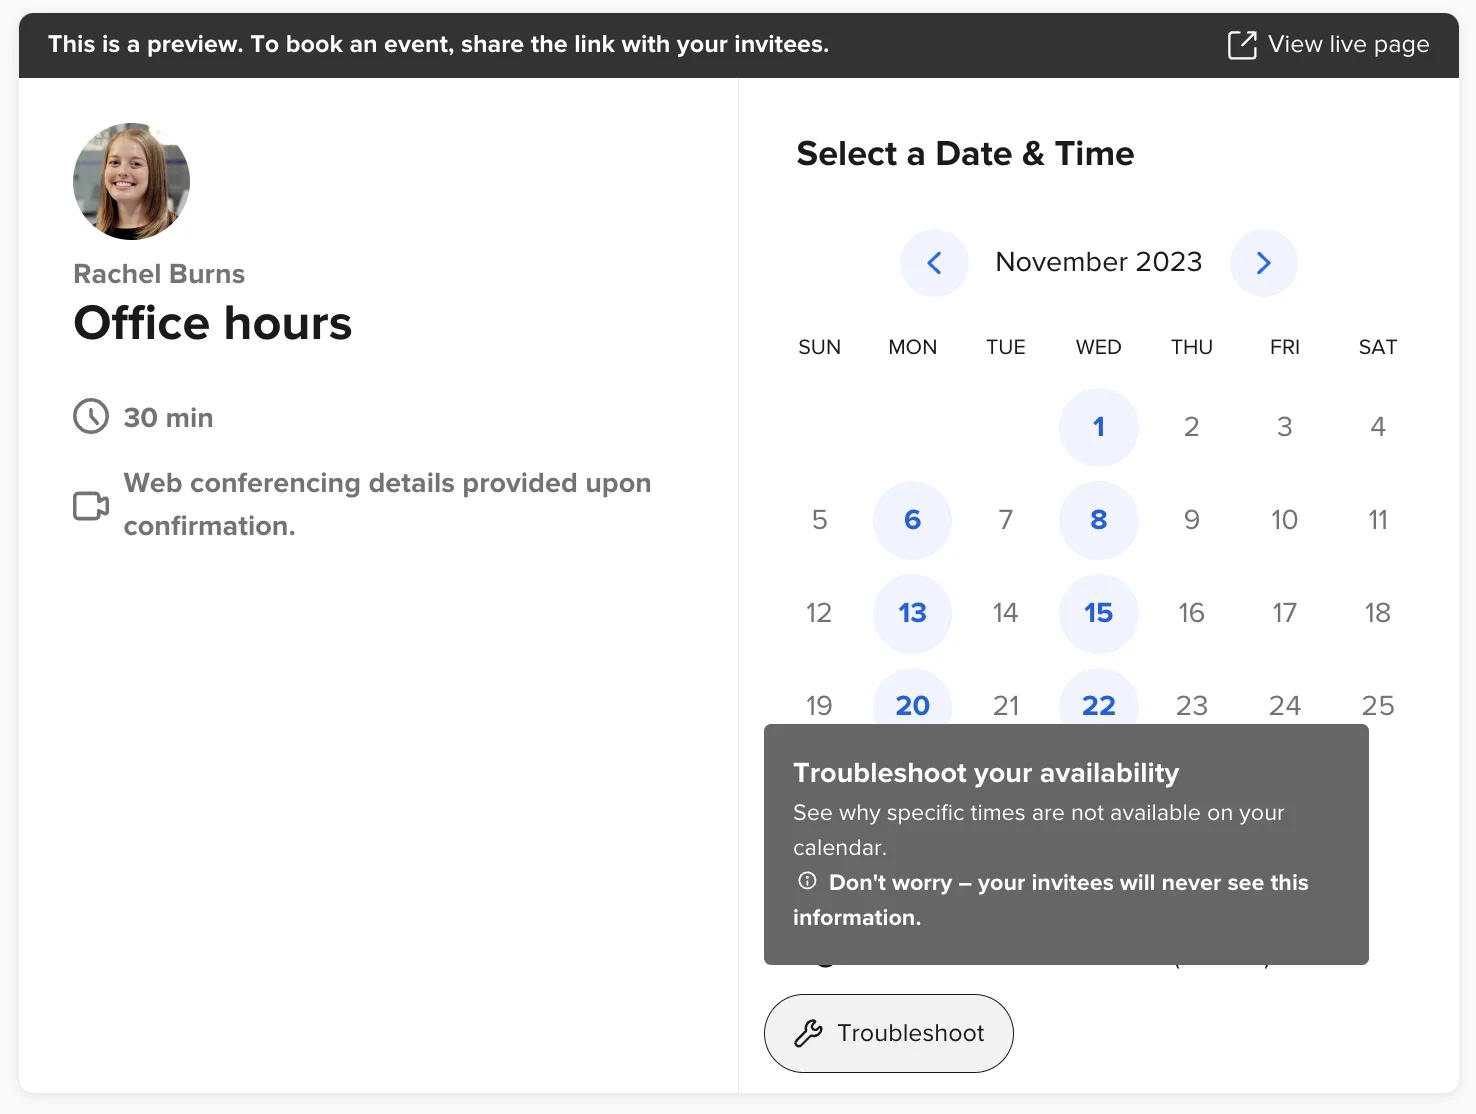
Once you’ve discovered why a certain time isn’t available, you can adjust your settings accordingly.
For more details on troubleshooting availability, check out this help center article.
Review your meeting communications
You’re almost ready to share your scheduling link and start booking meetings! Before you do, let’s do a little more testing to make sure your meeting confirmation emails look as good as your booking page.
First, we’ll need to get your scheduling link:
From your Calendly homepage, find your Event Type, then click “Copy link.”
From the Event Type editor, click the link icon at the top of the left-hand sidebar.
Now, you’ll need a test subject — you can test on your own with a different email address, or ask a teammate or a friend to help. Send them the link and ask them to book a time slot with you.
Once your test subject schedules a time slot, there are two types of notifications: a calendar invitation, which adds the event to their calendar, or an email confirmation, which sends your invitee a link to create their own calendar event. (The default option is calendar invitation, so we’ll use that as we continue our walkthrough.)
Calendly will send your test subject a calendar invitation. Review the invitation to make sure that all the information is correct.
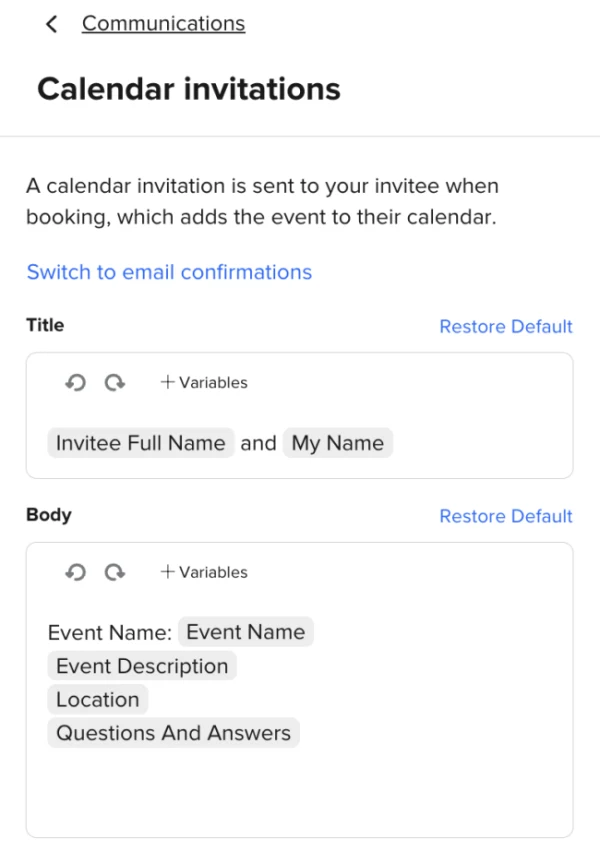
It’s easy to make changes to the calendar invitation. In the Event Type editor, select “Communications,” then, under “Basic communications,” click the three dots next to “Calendar invitations” and click “Edit.” If you want to send an email confirmation instead of a calendar invitation for this Event Type, click “Switch to email confirmations.”
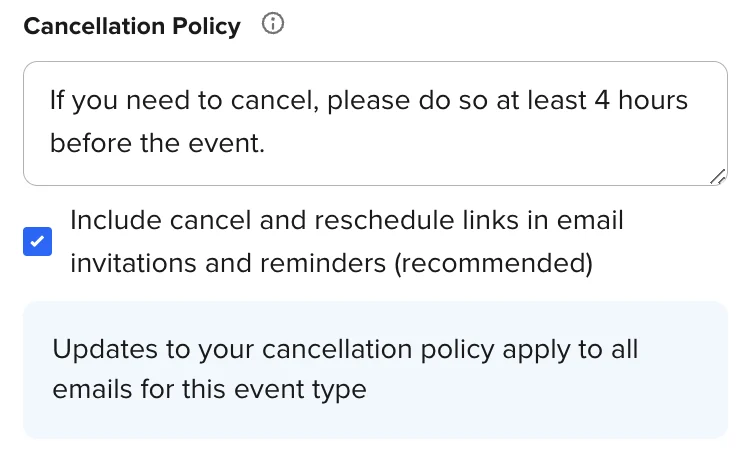
You can also decide whether you want to include cancel and reschedule links in event notifications. If you choose to include these links, when someone receives an email reminder about your event, they can cancel or reschedule by clicking the link.
At the bottom of the sidebar, check “Include cancel and reschedule links in email invitations and reminders (recommended).”
Last but not least, you can add your cancellation policy to let invitees know if and when they can change events. Your policy will be included in any email notifications your invitees receive. (Keep in mind that Calendly can’t enforce cancellation policies, just display them.)
Next steps: Sharing your booking page
Now you’re ready to offer the professional and streamlined scheduling experience you’ve always wanted. The next step is to explore the most effective ways to share your link so people will want to book time with you. It can be intimidating at first, but Calendly has you covered.
Check out part two of the Getting Started Guide. You’ll have all the information you need to put what you’ve learned here into action and start booking meetings ASAP.
Getting started with Calendly, part 2: Share your scheduling link

Marilyn Mead
Marilyn Mead is a Senior Product Marketing Manager at Calendly.
Related Articles
![[Blog Image] Solopreneur tools - Linktree](https://images.ctfassets.net/k0lk9kiuza3o/1wkZlQnAbm1ctUBPGyAaau/69272680a141cc0392797efc4687a9af/LinktreeCalendlyBlog.png?q=85&fm=webp)
Don't leave your prospects, customers, and candidates waiting
Calendly eliminates the scheduling back and forth and helps you hit goals faster. Get started in seconds.
Calendly eliminates the scheduling back and forth and helps you hit goals faster. Get started in seconds.